Tuesday, March 5, 2013

*WARNINGS* WHEN CREATING HOMEMADE CLEANERS

I am constantly baffled by how many frugal websites recommend a homemade cleaning agent with both bleach and vinegar in the recipe.NO.Never mix bleach and vinegar, bleach and ammonia, bleach and toilet bowl cleaners, or even different brands of toilet bowl cleaners (some are bleach based while others are acid based).

I often recommend cleaning your washing machine with 1 cup of vinegar, but DO NOT do so if you have recently used bleach or vise versa. Run a few loads before using one or the other again.

ALWAYS read your labels: Bleach can also be listed as sodium hypochlorite or hypochlorite.

When bleach and ammonia are mixed, depending on the ratios, Chlorine gas is created or Nitrogen Trichloride or Hydrazine.  Chlorine gas is deadly, Nitrogen Trichloride is very volatile (meaning it’s just dying to react) and the Hydrazine reaction creates a large amount of heat. Don’t even pour bleach into an unflushed toilet bowl.When bleach and vinegar are mixed it creates an acid base reaction with chlorine gas as a byproduct.Toilet bowl cleaners are often acidic and will also react with bleach.

Tip of the Day #245: Cleaning your Barbecue

Instead of pouring out your leftover coffee, save it to clean your barbecue grill. Old brewed coffee makes an effective cleaner when you pour it on your grill and wipe it off. Use it on your cold or hot grill.

Tip of the Day #244: Uses for Microfiber Cloths

I love microfiber cloths because they are so handy and do a great cleaning job--and you dont have to spend a lot of money! Try these hints for using them around the house:

Auto
Keep several microfiber cloths underneath the front seat of your vehicle. Use them to dust off the dashboard, radio and steering wheel that accumulate dust at a rapid rate.

Bathroom, Kitchen
Store a couple of microfiber cloths in these locations because they will clean and shine the chrome, shine mirrors & leave them streak-free and are great for wiping off the sink. When the cloths become dirty, toss them into the washing machine but DO NOT USE WITH FABRIC SOFTENER AS IT DIMINISHES THE CLOTHS EFFECTIVENESS.

Pets
Freshen up your dog by lightly dampening a microfiber cloth with water and wiping over its fur. If your cat or dog needs to get the gunk out of its eyes, a microfiber cloth will do the job nicely. And if your pet, gets a dirty -'beard' after eating, the cloth will remove that food mess.

Plants
To take dust off live or artificial leaves, lightly dampen a microfiber cloth and wipe over the leaves. This will also add a bit of moisture to the real plants too.

Computer
Pet hair, dust, ashes from smoking can migrate into your computer and clog the open holes. Use the hose attachment of your vacuum to remove pet hair and dust from the back of your computer. Clean the monitor case with a slightly damp microfiber cloth. Be sure to also dust the power cords, floor and area around the computer, printer and fax machine too.

Cell Phone
Wipe the handset surface with a dampened microfiber cloth to eliminate fingerprints and dust--this is especially useful with the popular touchscreen phones that are on the market! But if it’s still sticky, mix one cup of water with one drop of mild detergent to wipe off and then rinse area (not the screen) with a clean dampened cloth. Don’t spray anything into the handset or keys.

Digital Camera
To remove dust, grime and fingerprints, wipe the outside with a microfiber cloth and then carefully swipe over the lens. For a thorough cleaning, take to a professional or use commercial wipes.

Music Players
Wipe the outside with a slightly damp microfiber cloth to clean, but don’t let moisture seep into openings. Do not use alcohol or solvents on this equipment.

Plasma TV Screens
First, unplug the power cord. Lift off fingerprints or dust by wiping screen with a microfiber cloth. Use it to clean the remote control too. NEVER apply any solvent on the screen. Lightly vacuum the vents on the rear panel occasionally.

Monday, March 4, 2013

Tip of the Day #243: Dealing with Pet Hair

There are a few methods that I have found to be very effective in removing pet hair from furniture:

1. Put on a rubber glove. Rub the surface with it on. The pet hair should stick to your glove. Dampen the glove or rubber section of the glove for increased effectiveness.

2. You can use sellotape (packing tape) to peel off some fur. Just wrap some around your hand with the sticky, adhesive part sticking out and tap it on the fur-covered areas.

3. For areas that are not completely covered in fur, using a lint roller also works!

For your FLOORS, I highly recommend investing in a microfiber mop! A normal broom or vacuum tends to blow pet hair around, whereas the microfiber picks up every single piece--a true miracle worker! :)

Sunday, March 3, 2013

Tip of the Day #242: Removing Marks & 'Gunk' from Kitchen Cabinets


This recipe is one of the most useful mixtures in my house--mainly because my kitchen cabinets are white. Although I LOVE the look of white, they are not very practical :( I feel like I am constantly cleaning them!

You probably also notice how greasy and dirty your cupboards can get from daily use, regardless of their colour--especially close to the handles, mainly from sauces or food that may be on our hands, or even just the oils from our skin!

Use the following recipe and you are guaranteed to remove all unnecessary debris within a single wipe--its like MAGIC!

Ingredients:
2 parts baking soda
1 part oil (the best is vegetable oil)

Mix together and apply with a soft cloth or paper towel.

Hope this helps many of you! :)

Saturday, March 2, 2013

Tip of the Day #241: Cleaning Ceramic Stovetops

Cleaning your stove does not have to be a difficult task. It can be as simple as baking soda and water!
Sprinkle a generous amount of baking soda over the surface, then take a damp (NOT WET) scrubber or cloth and rub the powder in circular motions. Once all has been worked in, wipe clean with a soft cloth or you may choose to shine with a bit of glass cleaner.

Friday, March 1, 2013

Tip of the Day #240: Organizing Cleaning Essentials

I used to cringe at how unorganized and messy my mops and brooms would be when I either a)stuffed them in a closet out of the way or b)leaned them against the wall.
I researched ideas of how to take care of this dilemma and came up with the idea of using 'S Hooks' or even shower rings on a rod to hand each handle. Now my closet is so neat and organized--I'm in LOVE! ;)

Tip of the Day #239: Removing Scratches from Plates

The BEST product to use to remove plate scratches is 'Barkeeper's Friend' (can be found in your local hardware store.) Since it is somewhat abrasive, I suggest doing a test on the back of a plate first. To do the test patch, simply add a small amount of Barkeeper's Friend to a damp sponge and gently rub a small patch on the back of one plate. 

Once it has been determined that the cleaner and sponge will not scratch the plates, apply a small amount of cleaner to a damp sponge and gently rub the utensil marks off of the plates. One application might not be enough to remove dark marks, but be patient and try rubbing them off a few times.

IF the test resulted in your plate being scratched, (usually happens with delicate china) use another product called, 'Bon Ami' with the same instructions.

Thursday, February 28, 2013

Tip of the Day #238: Leftover Pasta

It is known that most of us have a difficult time gauging how much pasta to cook for a meal. I know myself that I am always left with enough to feed the entire neighbourhood! Instead of pitching it because the pasta generally doesnt 'keep' too well in the fridge afterwards, try this:
After your pasta has finished cooking and it’s time to drain it, don’t pour the water down the drain. Drain it into a large bowl and let it cool while you are eating.  When you have leftovers, put the leftovers back in the water.  Make sure the pasta is completely submerged. Cover the bowl and put it in the fridge. This will give you at least another week to finish the leftovers!

QUICK TIP: Lunchbox Love for School-Aged Children

Make your little ones feel special by creating some 'Lunchbox Love' for their lunches! Use colourful and cheery cardstock or scrapbook to produce little notes they can read while at school :)

Wednesday, February 27, 2013

Tip of the Day #237: Hang Pictures Easily

A useful tip for hanging pictures or wall decor is to use TOOTHPASTE! Dab a small amount on the back where all screws/nails will go, find your perfect place on the wall, press frame firmly against the wall-- and you're all set to hammer in your nails. It's that simple!

Tuesday, February 26, 2013

Tip of the Day #236: Easy Cleaning on Cupboard Tops

You may not think about this area very often--probably because you rarely see the top of your kitchen cabinets, that doesn't mean they aren't busy getting dusty and dirty. Grease, humidity and general kitchen use can make this a tricky and icky spot to clean. Forget the hassle and bust out a pantry staple to do the dirty work for you--WAX PAPER.

To keep the top of your kitchen cabinets (and tall armoires, bookcases and storage units) clean, simply tear a sheet the same depth as the cabinet and let it sit. It will collect the greasy, dusty goo that collects and then every few months you can change it out and ditch the collected junk. Easy peasy!

Monday, February 25, 2013

Tip of the Day #235: How to Clean Faucets Effectively

Soak a rag or cloth in white vinegar, then spread overtop of your faucet (including taps). Leave for 1-2 hours then wipe away all debris. If some dirt still remains in crevices, take an old toothbrush and scrub away!

Sunday, February 24, 2013

DIY i-SPY Game

I guarantee this will occupy your kiddos for hours!

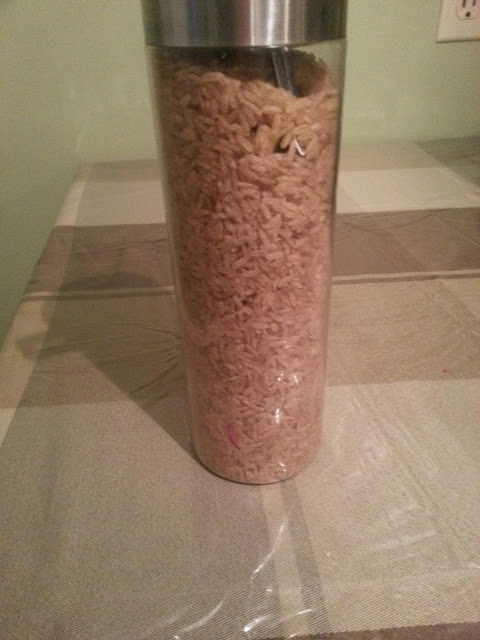
I have two very active children, so I am constantly looking for ways to occupy them. While brainstorming one night recently, I thought of this cute little game to make! It's easy, quick and doesn't require many materials.

So what's the object of the game? You create a game card with a list of the objects included in the bottle. Your kids have to shake the tube around to search for the items that you have hidden within the rice and tick them off!

When making, 'layer' the rice--in other words, you must pour the rice in, add a little trinket or two, then add more rice and so on. This is so all objects do not float along the top. Also, leave about 1 inch at the top of the bottle to ensure the rice is easy to shake around.

Some items you can include are:

-stickers
-bottle caps
-marbles
-beads
-bouncy balls
-barbie shoes
-fake flower petals
-pen lids
-little balls of foil
-small erasers
-dinky cars
-paper clips

Or anything small around your home!

WARNING: Always remember to seal the lid tightly on the bottle to ensure no small children can ingest any objects.

Tip of the Day #234: Organizing Office Supplies

We all know how office supplies from paper clips to elastic bands can really get out of hand and cause major clutter. I suggest using an ice cube tray or two to place the different items in each spot--then place in a cupboard or deak drawer. Remember to always return the objects to their designated area when necessary.

Thursday, February 21, 2013

Tip of the Day #233: Dealing with Odors in Garbage Bins

Odor producing mold and bacteria in garbage cans can be dealt with by sprinkling 1/2 cup Borax in the bottom of the garbage can.

Tip of the Day #232: Best way to Disinfect Sponges & Cloths

 To disinfect smelly sponges, wash sponge thoroughly, then microwave it while it is wet, for a short period. When you see steam from the sponge, the bacteria in the sponge will be dead. Remove carefully, it will be hot! Wash the sponge thoroughly before use.

**Make sure the sponge has no metal components!**

Tip of the Day #231: Dealing with a Stye in your Eye

If you have a stye in your eye, boil some water, soak a regular tea bag in the water for about 2 minutes, don't put sugar or milk in the tea! ;) Take the tea bag out as hot as you can stand it and place it over the offending eye until it cools. Repeat this a few times a day.

Tip of the Day #230: Diminish the Looks of Scars

I was burned in a house fire awhile back and I can tell you this method truly works!

Gently massaging a scar after the area is well healed but within the first six months of the injury can help minimize scarring. By massaging you are helping to stretch out and soften the scar be helping break down the tough collagen fibers that are forming as part of the scar maturation.

DIY JEWELRY HOLDER

Since I am overly obsessed with ORGANIZATION, one thing that always bugged me was never having a place to hang all of my necklaces and earrings--leaving me to lose quite a few that became tangled with no hope of fixing! So sad.

When I was at the Dollar Store a few days ago, I came up with a great and inexpensive way to organize these items! I purchased an 8x10 photo frame ($1.50), corkboard sheets ($1.00/20 pack--I used 5 sheets for thickness) and a 100 pack of push pins (1.00--I used 4), making this organizer a total of $1.79!!!!!!! You can't go wrong there!!

To create, all you need to do is replace the glass from the photo frame with a few sheets of corkboard (thick enough that your pins will poke through). Stick your push pins wherever you want and hang your jewelry! I will be placing this organizer on the wall soon, but depending how long your jewelry is, you can choose to leave on your dresser or a table!