Friday, January 11, 2013

Tip of the Day # 160: Permanent Marker Removal

How to Remove Permanent Marker from Various Surfaces

This definitely comes in handy at my house where my kids always seem to find my Sharpies no matter where I hide them! It has saved my couch cushions, dining room chairs, floor and various articles of clothing! Haha

Clothes –hand sanitizer
Walls –toothpaste or hairspray
Carpet  –white vinegar
Wood   –rubbing alcohol

Thursday, January 10, 2013

Tip of the Day # 159: Purse Organization

Organizing Your Purse

1. First clean out clutter. Such as Gum Wrappers, old receipts, candy, etc. Its best to clean out all of the junk before it either makes a purse smell horrible, or drives you bonkers sifting threw your junk like sand at the beach. A good habit to get into is never storing food items in your purse! From having kids, I know first-hand how easily cookie or candy packages can bust open--creating a scavenger hunt for you...except not in a fun way!

2. Invest in a wallet made with so many pockets you don't know what to do with. Chances are you'll find something to do with them. In your wallet have any paper items, pictures, money, loose change. It's hard to imagine a purse without the jingling change that sounds like reindeer on Christmas but you'll learn to live with out it. For this, make it a habit to put cards and change in their proper place RIGHT AWAY when given them back. Ive definitely had a few panic attacks in line at a store searching for my debit card!

3. Get some makeup bags. You know those tiny little make-up bags that's used for eye pencils? Yes, invest in one of those. Put all your little misfit items in it such as hand sanitizer, lip stick, deodorant, tampons, etc.

4. Think about buying a new purse that has some pockets for, say your cell phone. Plus who doesn't deserve a new purse every once in a while. It will also encourage you to empty your old change and empty the junk.

5. Take a few moments out of everyday to look in your purse and un-clutter a little--remove all items that should not be in there and put away immediately!

Tip of the Day # 158: Natural Toilet Bowl Cleaner

DIY Toilet Bowl Cleaner

½ cup baking soda
10 drops tea-tree essential oil
1/2 cup distilled white vinegar

INSTRUCTIONS
Pour baking soda directly into the toilet bowl, add oil, then vinegar—in that order. Let water effervesce for several minutes, then scrub bowl with brush. Flush.

Tip of the Day # 157: Yarn Organization

Do you have bits of yarn lying around that you refuse to get rid of? To keep them organized and free of knots, wrap around a clothes peg and close off with the end! I love this trick!

Wednesday, January 9, 2013

Tip of the Day # 156: Decluttering a Bathroom

I really dislike a cluttered bathroom, especially in drawers and on the counter. So I had to find a solution as to where I was going to put all these items!
I was actually able to find a hanging organizer at Walmart that I hang in a closet! Included are many of my beauty supplies like nail polish, clippers, nail files, bobby pins, wipes--you can really include anything that will fit!
Now, I never have to worry about searching around for that certain nail polish! ;)

Tip of the Day # 155: Organizing Junk Drawers

Organizing your Junk Drawer

Everyone has one...or two of these types of drawers, full of old batteries, cords, pens, loose papers, etc. I dread opening this drawer in our home because it makes me cringe every time attempting to find that one small item I need!
Although it may take you a little while to go through it the initial time, it is definitely worth organizing for the future!
First, remove EVERY item from the drawer and wipe down the inside thoroughly. Next, grab about 3-4 small plastic containers (or re-use margarine,yogurt, or any others lying around). Begin categorizing all items; batteries in one container, loose change in another (a plastic water bottle is a nice alternative because it has a tight lid). Label all manuals and place in a pile flat on the bottom of the drawer. Test out all pens and throw away any defectives ones. Label all cords (bread tabs are great for this) and place them all together--if you have a strap of any kind, it is great to tie it around your group of cords.
Once your improved drawer is complete, take a sigh of relief and maintain its organization to make life just a little more simple! :)

Tip of the Day # 154: Get a handle on Kids Toys

Organize your children's smaller toys or dolls in a shoe organizer on the back of a door. Teach them to go there for the items, and always return them to the pockets as well!
This is great for little boys Hot Wheel cars too!

Monday, January 7, 2013

Tip of the Day # 153: Hair Spray removal from walls

How to Remove Hairspray from Walls & Mirrors


1. Pour rubbing alcohol into a small bowl. Dip either a cotton ball (most effective) or small soft cloth into the alcohol and wring excess out.

2. Wipe down wall/mirror with solution.

3. Once complete, finish the job by wiping the wall down again with a hot, soapy cloth.

THAT'S IT! :)

Tip of the Day # 152: Keeping the bugs out of sandboxes

 Sprinkle cinnamon into you child's sandbox--it helps in keeping the bugs away!

Sunday, January 6, 2013

Tip of the Day # 151: Cleaning Fans

The Best Way to Clean your Fan


I am one of those people that NEEDS to have a fan on at all times when sleeping for the sound! Unfortunately, what comes with that is having to clean it more often than I really want to. Not only is it unsanitary, but I dread looking at the fan getting out of bed every morning!
I've tried various methods to figure out the easiest and fastest way to clean my fan--and the most effective has to be using a DRYER SHEET! I just run it across all grates at once, then slide along each one to catch the remaining particles. If the blades are bad too, open up your fan and wipe clean with a dryer sheet as well.

Tip of the Day # 150: LEGO Cleanup

CLEANING UP LEGO PIECES


 Use a fitted sheet under the dumped Legos.  Keep the Legos contained to on top of the sheet area, and then when finished scoop up the Legos inside the sheet and dump back into the container.  So easy. So simple. So foot pain-free!

Saturday, January 5, 2013

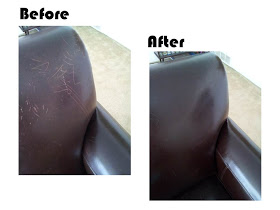
Tip of the Day # 149: Removing Scratches from Leather surfaces

How to remove scratches from leather!

Leather furniture sure is beautiful, but over time, it can really take a beating from your pets, kids or just overall, use!

There is a simple trick to remove those pesky scratches that appear--OLIVE OIL! That's all you need!

Use a soft cloth to rub the olive oil into the leather in circles--the key is really rubbing it in.  Follow up with a paper towel and buff a bit.  If you are worried about oil residue on the leather, the paper towel buffing really takes care of that, ensuring there is no oil left on surface of leather. 

Tell me about your results! :)

Tip of the Day # 148: Growing Garlic at Home

GROW YOUR OWN GARLIC

Did you know that one clove or bulb of garlic, when planted, can produce up to an additional twenty cloves? So instead of tossing out your garlic that's started to sprout, plant it instead!

1. Simply plant garlic cloves individually. If they've started to sprout, even better! Otherwise plant them with the pointy end up. Make sure they are in a sunny location and soil isn't too damp. You can plant multiple cloves four inches apart either in your yard or in a pot. It will fair well even if planted among other flowers or vegetables.

2. Then just sit back and wait for your garlic to grow. If it's potted, water it occasionally but don't drown it. As your garlic grows, it will sprout leaves. Once the leaves turn brown and die, it's time to harvest your garlic. (Don't harvest any earlier or your cloves will be too small!)

3. Once you harvest your garlic, hang the bulbs in a cool, dry location to dry them and prevent rot. Your garlic should dry in about a week, at which time you can simply brush off the dirt and start cooking with the cloves or plant some more!

Thursday, January 3, 2013

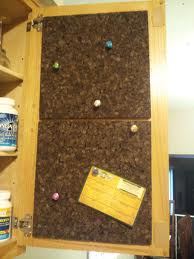
Tip of the Day # 147: Corkboards for Kitchen Cabinets

Adhere cork boards (available at the dollar store) to the inside of a kitchen cupboard door to keep important notices from being lost. This way, they are out of sight and prevents from cluttering your fridge or counters--helping you maintain a tidy kitchen! :)

Tip of the Day # 146: Painting Tips

Protect doorknobs and hardware in the kitchen and bathroom when you're painting by wrapping foil around them to catch dribbles. The foil molds to the shape of whatever it's covering and stays firmly in place until the job is complete!

Tip of the Day # 145: Sinus Relief

Easy Sinus Relief

All you need is:

1 1/2- 2 cups uncooked white long grain rice (DO NOT use instant rice. It will catch fire/burn when being heated.)

An old cotton sock

Optional: A few drops of eucalyptus essential oil
Note: If you want to use this for headache relief, add peppermint essential oil instead of the eucalyptus.

Instructions:

Just pour the rice into the sock (and essential oil if you are using it) and tie closed. Next time you are in need of sinus relief, just heat it in the microwave for approximately 45 seconds (depending), and place wherever you are in pain.

***WARNING: BE VERY CAREFUL WHEN HEATING--IF YOU ARE UNAWARE OF HOW 'POWERFUL' YOUR MICROWAVE IS, BEGIN WITH 30 SECONDS AND REHEAT IN 10 SECOND INCREMENTS TO BE SAFE.

Wednesday, January 2, 2013

Tip of the Day # 144: Cleaning your Coffee Grinder

Rice as Coffee Grinder Cleaner


 Mill a handful of grains in your grinder and the fine particles will absorb stale odors and clean out residual grounds and oil.  Discard the rice and wipe clean.

Tip of the Day # 143: De-icing your Steps

HOW TO PREVENT ICY STEPS IN THE WINTER


Mix 1 tsp dish soap ( I use Dawn for this), 1 tbsp rubbing alcohol & 1/2 gallon of HOT water--then pour over steps!

Tip of the Day # 142: Duvet Covers


Put a Duvet Back in Its Cover in less than 25 seconds!

1. Fold the duvet cover into quarters so one long opening is facing you.
2. Fold the duvet into quarters.
3. Slide the duvet, long crease first, into the opening of the duvet cover.
4. With your fingers, hold the two open corners of the duvet cover, along with the duvet corners. Shake it out.
5. Look at your perfect duvet. Do your happy dance!

Tip of the Day # 141: DIY Seedling Trays

If you love to garden, you will definitely appreciate this post!

Follow the easy step-by-step guide below to make your own seedling trays!